How To Create a Product Development Timeline In 6 Steps

Managing product development timelines can be incredibly challenging. As a product manager, you have to balance multiple workstreams, dependencies between tasks, limited resources, and shifting priorities, all while trying to deliver value to customers promptly.
It’s easy for timelines to slip, dependencies to get missed, and scope creep to spiral out of control if the process isn’t planned carefully.
In this article, we will focus on creating a product development timeline that sets reasonable expectations, minimizes risks, and helps your team successfully deliver new features and releases on schedule.
What Is Product Development Timeline?
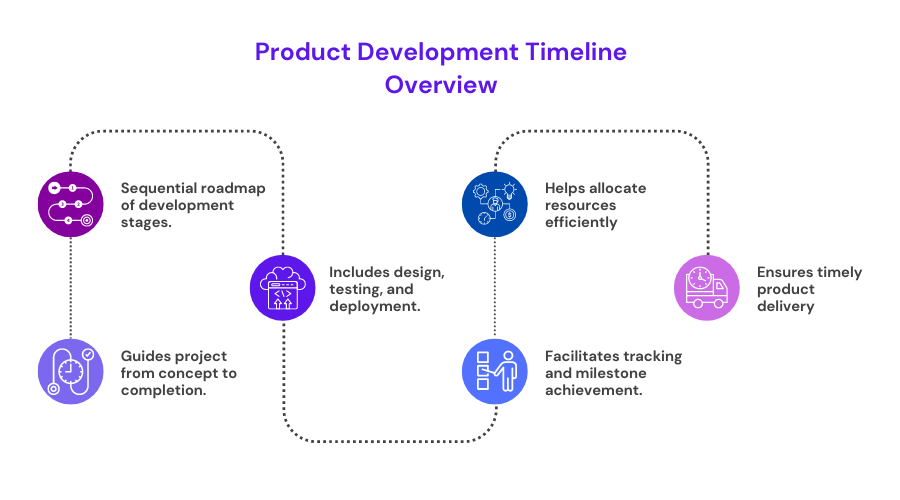
A product development timeline is the estimated schedule that outlines the key stages involved in bringing a new product to market. It charts the sequence of activities from conceptualization to launch. It lays out target dates for completing each stage of development.
A clearly defined timeline helps ensure the product development process stays on track. It prevents scope creep by keeping feature additions and changes in check. The timeline also allows management to allocate resources efficiently and plan budget accordingly.
For example, a software startup estimated it would take 12 months to develop their new accounting app. Their timeline allocated three months for concept work, four months for design/development, two months for testing, and three months for production and launch activities. It helped the team track progress and meet deadlines.
Steps to Create a Product Development Timeline
- Generating Concepts
- Research and Analyze
- Detailed Blueprinting
- Preliminary Model Creation
- Beta Release and Refinement Cycle
- Product Launch
Step 1. Generating Concepts
The first crucial step in developing a product timeline is fleshing out potential concepts. A team evaluates each idea during this ideation phase to determine feasibility, market fit, and potential value.
For each concept, questions get asked: What problem does this solve? Who is the target customer, and will they care? Is this addressing a true need in a novel way? Early market research through surveys and focus groups helps gauge customer interest and uncover gaps.
Concurrently, you have to run patent searches to avoid duplicating existing solutions. Concepts get refined, expanded on, or scrapped based on these evaluations. Developing the strongest viable concepts into preliminary specifications lays the groundwork for further planning.
Let us say you are a startup developing a new sales analytics tool. Then, this stage may involve interviewing sales VPs with prospective clients. Feedback could highlight common pain points in existing offerings and validate a new approach. Competitive analyses would assess open territory in the market.
With customer and competitive insights in hand, the team iterates on early ideas until several product visions crystallize. Only concepts that plausibly fill real needs advance to the next phase of prototype development and business planning.
For ideation, you can use a top-notch tool like Idea Box by Chisel, which acts as a central repository to store ideas from team members, stakeholders, and customers.
Step 2. Research and Analyze
This stage is crucial for laying the groundwork for a successful product.
First, you must understand your target audience. Who will use this product, and what specific needs does it address? Factors like demographics, pains, and goals provide vital context. Armed with audience insights, the next task is competitive analysis.
Researching similar existing products reveals their strengths, weaknesses, and pricing strategies. It allows you to identify white space for your unique value proposition. Understanding competitors is key for differentiation and viability.
With market and competitive landscape in view, feasibility can get determined. Will the product deliver value within the timeline and resource constraints? Are there any technological or manufacturing roadblocks to address? Addressing feasibility upfront prevents wasted efforts.
Establishing a clear, measurable goal ensures focus and alignment across the organization. The objective should solve a real audience problem and create value. With targets and goals set, milestones emerge as logical next steps.
Major milestones become checkpoints toward the overarching goal. Assigning owners and due dates to each keep the project progressing systematically. From here, a preliminary timeline starts to take shape with budgets, schedules, and accountabilities defined.
Step 3. Detailed Blueprinting
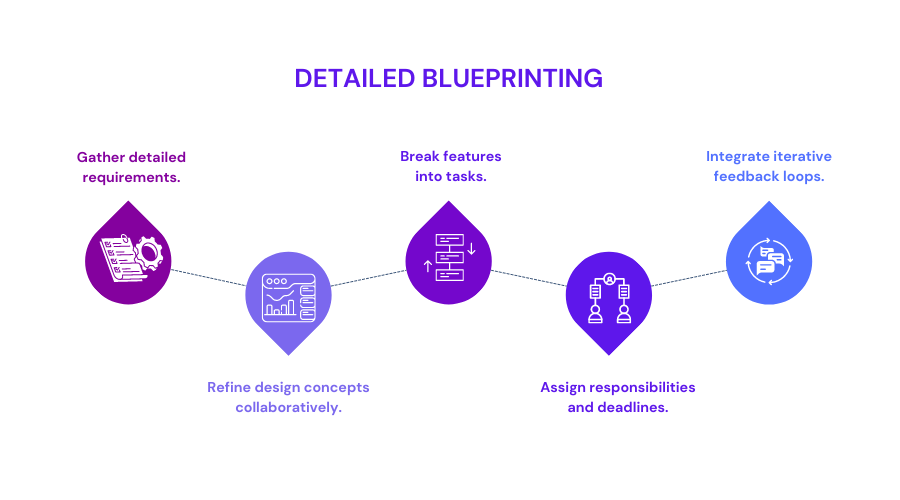
Building the perfect product is like putting together a puzzle – you must have all the pieces in the right place to see the whole picture. And creating a blueprint is when we lay all those pieces out to plan our game plan.
The first piece of the puzzle is envisioning the core features. As a developer, you need to understand the central problem the customer is trying to solve. What will truly make their lives easier? That’s where we start sketching out the basics of what our product will do.
But it’s not enough to just know the big picture items. You have to zoom in on the finer details, too. That’s when you draft user stories to flesh out how each feature will interact. These are like little scenarios that place us in the customer’s shoes to experience the feature firsthand.
Now that you can visualize what we’re building, it’s time to figure out how to actually put all the puzzle pieces together. When we map out the technical architecture – the framework- it ties all the features and coding behind the scenes. What platform will we use? How do the databases connect? These are the building blocks.
From there, you start to bring the product to life visually. Wireframes act like templates to preview what the interface style and flow might look like. Mockups then simulate color and real imagery to give customers a taste of the finished product.
Finally, no puzzle is complete without testing that each piece fits perfectly. That’s why testing planning is so critical. You don’t want any bugs or defects in the final picture. So, you scrutinize how features interact and ensure everything works as intended for launch.
Once all the puzzle planning is in place, developers have the full picture they need to start fitting the pieces together – and that leads to smooth product delivery within budget and on schedule. The customers get the complete solution they envisioned, and we get the satisfaction of a well-done job.

Step 4. Preliminary Model Creation
Creating a product prototype is an essential milestone in any product development timeline. A prototype allows you to test your ideas in the real world and gather valuable feedback.
The process of prototyping can vary significantly depending on what you’re building. For simpler physical products, you may be able to assemble a basic prototype using off-the-shelf components to demonstrate functionality and get initial user reactions. However, more advanced tech products often require specialist engineering expertise to design and build prototypes.
Once built, thorough testing of the prototype is key. You’ll want to identify any issues or areas for improvement before moving forward. Depending on your product, testing may be done internally or by an outside testing firm with the needed equipment and labs. The insights gained will shape further refinements.
With learnings in hand, the next step is to refine your prototype into a production-ready version. It means finalizing specifications, sourcing high-quality components, and establishing manufacturing processes that can scale up as needs grow. Getting this right lays the foundation for smoothly bringing your product to market.
Developing a new product takes time, and prototypes are an essential checkpoint.
For a company creating a new inventory management platform, initial prototypes may allow testing core functionality with a small set of pre-launch customers. Feedback would then inform the production version rolled out on a larger scale.
Overall, the prototyping phase helps de-risk new product development by exposing issues early.
Step 5. Beta Release and Refinement Cycle
Now that you’ve built out our minimum viable prototype, it’s time to put it in the hands of real users to get their take. After all, they’re the experts – they live and breathe in the problem space daily.
There are a few different ways you can uncover this golden user feedback. Focus groups are a great way to get qualitative input. You invite a small group of target users to interact with the prototype and promptly engage them with questions! What’s clicking? What’s clunky?
Another option is rolling out beta tests. “Usability testing shows you if something is usable. Beta testing shows you if people will actually use it.” – Rachel Decker.
For this testing, you can recruit a group of pioneers willing to be part of the process. As they use it organically, you track any bugs or hurdles. The data they provide is priceless as we near launch.
Let us say you are a project management software. Then, you could run focus groups with project managers from different industries, watching as they plan a sample project. It would surface any pain points in our interface or missing core features.
For beta testing, you could recruit various small companies to use our prototype for real projects over several weeks. By analyzing usage patterns and surveys, you will ensure it seamlessly supports their workflows.
Once you’ve managed user feedback, it’s time to put it to good use. Whether updating individual elements or the overall roadmap, tracking how each insight shapes future development is essential. Your product won’t be elite until the real experts give it five stars – so let the testing begin!
High-quality product management tools like Chisel are invaluable for efficiently collecting and managing user feedback. Whether leveraging advanced AI capabilities or utilizing outstanding tools like Feedback Portal, Chisel offers a comprehensive solution for these critical processes.
Step 6. Product Launch
After months of prototyping, testing, and refinements, your new product is ready for prime time. However, a successful launch does not happen by chance – it requires careful planning and execution. Here are some key things to focus on as your D-Day approaches.
First and foremost, ensure all necessary documentation is in order. Customers will want quick answers to questions like “How do I set this up?” or “What are the terms of use?” Have comprehensive manuals, sheets, legal docs, and so on ready.
Creating a targeted marketing strategy is also paramount. Who exactly is your ideal customer? Where do they spend time online? What messages and channels will compel them to try your solution? Don’t forget promotion budgets, too.
Equally important is training your team. Everyone handling inquiries must have a firm grasp of features, troubleshooting steps, and pricing models – customers will expect knowledgeable support.
Consider also preemptively handling “what if” situations. How quickly can you respond to technical glitches or suddenly high volumes of signups? What refund policies are in place if beta users aren’t satisfied? Smooth sailing depends on planning for potential rough waters.
Let us say you are project management software. You can meticulously prepare all documentation, train your sales engineers extensively, and estimate the beta workload. You can promote heavily at conferences and via targeted ads. Monitoring analytics post-launch will reveal which channels drove most trial conversions, informing future strategies. Your thoughtful pre-launch work paid off in strong initial adoption.
The launch period is make-or-break. But by diligently focusing on the right preparations, your product can get the launch it deserves to succeed in the long term. Just keep gathering feedback to refine your offering and strategy continually.
A proficient roadmap tool is essential for a successful product launch. Whether managing launches, prioritizing features, or overseeing timelines, Chisel is your essential foundation.

Key Takeaways
Creating a clear and achievable product development timeline is crucial for successfully bringing any new product to market. By outlining each process step from ideation to launch and estimating time frames for each, a company can gain a holistic view of the project requirements and dependencies.
This article guided me on structuring a timeline into phases with appropriate parallel and sequential activities. It emphasized balancing innovation with realistic schedules and iterating the timeline as we learn more throughout development. By dividing large projects into modular milestones with deadlines, complications can be troubleshooted, and the overall timeline can get adjusted to maintain feasibility.
With a well-planned timeline, businesses can feel confident in executing their product vision from start to finish. It allows coordination between various internal teams, external partners, and suppliers. Most importantly, it helps ensure customers receive the final product without undue delays.
If you require additional support mapping out your next product launch, consider using product management software like Chisel. Chisel’s intuitive tools help streamline timeline creation, provide real-time updates, gather seamless feedback, and much more. Head over to chisellabs.com to learn more. You can even sign up for a free trial to experience how Chisel helps drive productivity and outcomes for your organization.
